This recipe demonstrates how you use Intel® VTune™ Profiler as a web server when you develop and tune performance on a remote development machine. As an example, we use a compute node at Intel® DevCloud for oneAPI for a remote machine.
Content expert: Stas Neverov, Jennifer DiMatteo
DIRECTIONS:
Ingredients
Here are the hardware and software tools you need:
Access to Intel® DevCloud for oneAPI
- Intel® VTune™ Profiler (available on Intel® DevCloud for oneAPI
Note
Starting with the 2020 release, Intel® VTune™ Amplifier has been renamed to Intel® VTune™ Profiler.
Most recipes in the Intel® VTune™ Profiler Performance Analysis Cookbook are flexible. You can apply them to different versions of Intel® VTune™ Profiler. In some cases, minor adjustments may be required.
Get the latest version of Intel® VTune™ Profiler:
From the Intel® VTune™ Profiler product page.
Download the latest standalone package from the Intel® oneAPI standalone components page.
Setup Overview
With v2021.1.1 and newer versions, you can run Intel® VTune™ Profiler as a server and access it remotely using a web browser. This setup is useful when you develop applications on a remote system.
- You can run Intel® VTune™ Profiler on the system where you do development, so it has direct access to the binaries, debug info, and source files.
- Intel® VTune™ Profiler also stores the collected traces and processed data on the same system so you do not have to transfer this heavy data to your client system for analysis.
- You do not need to install anything on your client system. You only need a web browser to access the Intel® VTune™ Profiler GUI.
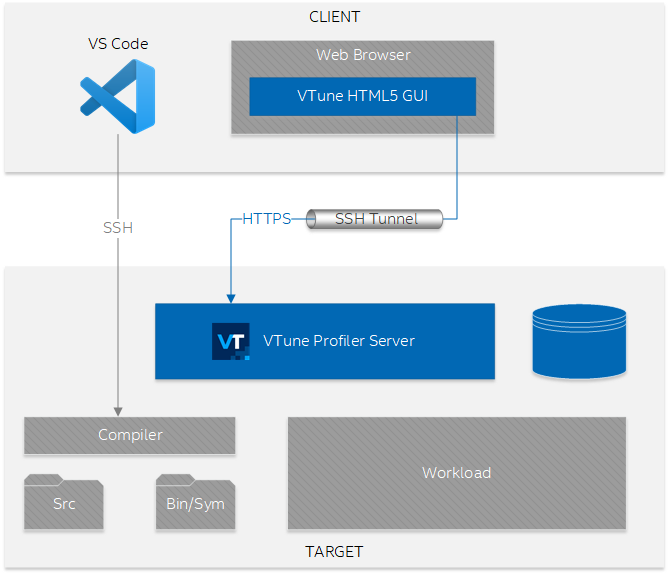
This figure illustrates the setup for this scenario:
Option 1: Use Intel® VTune™ Profiler Server for Remote Development with Visual Studio Code
Log into Intel® DevCloud for oneAPI.
Set up the VS Code connection. When you complete this procedure, you should get local VS Code connected to a compute node in the DevCloud.
Run Intel® VTune™ Profiler server on the compute node from the VS Code terminal:
vtune-backend --enable-server-profiling
Run the Intel® VTune™ Profiler GUI. Control+click the URL displayed by Intel® VTune™ Profiler server in the VS Code terminal to open the Intel® VTune™ Profiler GUI in your web browser.
Option 2. Use Intel® VTune™ Profiler Server on a Remote System via SSH Terminal
In this case, you must manually set up SSH tunneling. To simplify this procedure, run VTune on a specific port (55001 in this example). You can select a different port if 55001 is busy.
Log into Intel® DevCloud for oneAPI.
Follow the instructions for Windows or Linux / MacOS systems and set up an SSH connection into the DevCloud.
Log into the DevCloud login node:
ssh devcloud
Reserve a DevCloud compute node:
qsub -I
Note
Do not close the terminal after this step, as the action will release your compute node.Open a new terminal.
Log into the DevCloud node again, this time with SSH Port forwarding enabled:
ssh -L 127.0.0.1:55001:127.0.0.1:55001 devcloud
Establish an SSH connection from the login node to the compute node with one more SSH tunnel:
ssh -L 127.0.0.1:55001:127.0.0.1:55001 s000-n000
Replace s000-n000 with your compute node name.
Start VTune server on the compute node:
vtune-backend --web-port=55001 --enable-server-profiling
Open the VTune GUI. Use your web browser to open the URL displayed by the VTune server.
Finish Setup
Whether you chose Option 1 or Option 2, complete the setup by following these steps:
Accept the VTune server certificate.
When you open the VTune GUI, your web browser may prompt you about the VTune server self-signed certificate. You can proceed safely without installing the certificate because the SSH tunnel provides protection from Man-in-the-Middle (MitM) attacks. For more information on transport security, see Set Up Transport Security.
Set the passphrase.
When you run VTune server for the first time, the URL that it displays should contain a one-time-token. When you open this URL on a browser, Intel® VTune™ Profiler server prompts you to set a passphrase. Other users cannot access your Intel® VTune™ Profiler server without the passphrase. The hash of the passphrase is persisted on the server. Also, your browser stores a secure HTTP cookie so that you do not need to enter the passphrase each time you open the VTune GUI. Once you set the passphrase, the Intel® VTune™ Profiler welcome screen opens.
Create a project.
Configure an analysis. Your remote machine (running the Intel® VTune™ Profiler server) is selected as the target system by default since you ran the server with --enable-server-profiling option.
Set the target application path and any command-line arguments. For more information, see Set Up Analysis Target.
Run the analysis.
Usage Considerations
The setup described in Option 1 relies on the functionality of the VS Code Remote - SSH extension to watch port numbers used by processes that are started through the VS Code terminal. The Remote - SSH extension automatically forwards these ports through the SSH tunnel. This action is controlled by the remote.autoForwardPorts setting, which is enabled by default.
You can use the --enable-remote-profiling command-line option to enable the system that hosts VTune server as the performance profiling target. This option is disabled by default for security because running a VTune analysis involves launching a target application, which is an arbitrary command line. If multiple users have access to a single instance of VTune server, they would get access to execute arbitrary code on behalf of the user account that runs the Intel® VTune™ Profiler server. Enable --enable-remote-profiling only when VTune server is intended for a single user and you do not share the passphrase used to access the server.
Use the --web-port=PORT command-line option to run VTune server on a specific port. Otherwise, Intel® VTune™ Profiler will run on any arbitrary port available on the system.
VTune server displays this warning in the output:
warn: Server access is limited to localhost only. To enable remote access restart with
    --allow-remote-ui.
Because this procedure uses SSH port forwarding, you do not need to enable --allow-remote-ui. Incoming connections to the VTune server come from the SSH server and they are localhost connections. If you enable --allow-remote-ui, VTune server builds a URL with the real network card IP address or FQDN name, which may not be accessible from your client machine.By default, VTune server stores profiling results in your home directory. Use the --data-directory command-line argument to specify a different data directory. You can also use this argument to open pre-collected Intel® VTune™ Profiler results in Intel® VTune™ Profiler server. Intel® VTune™ Profiler can locate its results in any child folders.